• Hello there guest and Welcome to Modular Fox Mustangs home of the 2V, 3V, 4V, Coyote Modular Mustang Conversion Information Website!
    To gain full access you must Register. Registration is free and it takes only a few moments to complete.
    Already a member? Login here then!

BBK X-pipe hits trans member on 89 2V swap

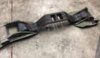
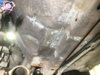
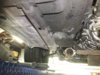
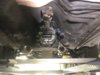
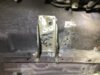
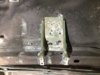
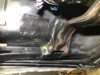
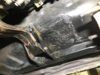
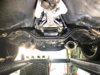
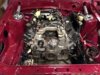
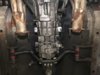
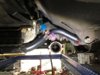
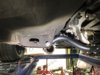
I got the motor and trans dropped in. I put the BBK long tubes in that fit surprisingly well, but when I held up the h-pipe to check, it hits the crossmember. I was told that the BBK's would fit, and that's why I bought them.

Has anyone run into this before? And if, so, how did you remedy it?
 

Attachments

  • engine in.jpg
    engine in.jpg
    128.4 KB · Views: 11
  • bbk3.jpg
    bbk3.jpg
    80 KB · Views: 12
  • bbk2.jpg
    bbk2.jpg
    99.7 KB · Views: 11
  • bbk1.jpg
    bbk1.jpg
    103.7 KB · Views: 9

Bill

Well-Known Member
Staff member
Donator
I've never used long tubes, but that looks like a pain to fix. Do you think you will be able to adjust the header? Another option is to use a factory SN95 transmission crossmember and brackets. They are readily available at virtually any salvage yard and a relatively easy install.
 
I've never used long tubes, but that looks like a pain to fix. Do you think you will be able to adjust the header? Another option is to use a factory SN95 transmission crossmember and brackets. They are readily available at virtually any salvage yard and a relatively easy install.

Thanks Bill. I dug through some crates and I found the factory crossmember from the 98 that I parted out. I think I could fab it up fairly easily by either making mounting brackets to hold it, or getting the stock chassis brackets from a 98. Do you by chance know if the distance between the frame rails are the same from an 89, to a 98?
 

Bill

Well-Known Member
Staff member
Donator
I don't know if they are exactly the same, but I remember being able to mount the brackets on the cross member, raise them up with a transmission jack and tack them into place, so they fab up to the undercarriage easily. I remember thinking I should do a bunch of measuring to ensure a good pinion angle, but I didn't. I just raised it up, centered it and tactactac :)
 
I don't know if they are exactly the same, but I remember being able to mount the brackets on the cross member, raise them up with a transmission jack and tack them into place, so they fab up to the undercarriage easily. I remember thinking I should do a bunch of measuring to ensure a good pinion angle, but I didn't. I just raised it up, centered it and tactactac :)

Thank you Bill. I cut some brackets from a 98 at U-Pullit. I'll post pics when I make progress.
 

Attachments

  • C11BD8D7-A92E-4A2D-B652-A46130500E86.jpeg
    C11BD8D7-A92E-4A2D-B652-A46130500E86.jpeg
    210.4 KB · Views: 7
  • 92E27C31-25D1-48FF-8A83-AFD4C89E6585.jpeg
    92E27C31-25D1-48FF-8A83-AFD4C89E6585.jpeg
    354.9 KB · Views: 5
  • F5C7CC64-3280-4EFE-AFC6-D21F28B2115A.jpeg
    F5C7CC64-3280-4EFE-AFC6-D21F28B2115A.jpeg
    318.2 KB · Views: 5
  • 28B1701D-8F91-4EBE-B94F-47F680DB085F.jpeg
    28B1701D-8F91-4EBE-B94F-47F680DB085F.jpeg
    249.3 KB · Views: 5
  • 4E064CD3-2BA0-4AE0-8CC7-E753FC9AD393.jpeg
    4E064CD3-2BA0-4AE0-8CC7-E753FC9AD393.jpeg
    290.2 KB · Views: 5
  • 07554FB5-2530-4381-AC56-FD5FF21D3AB5.jpeg
    07554FB5-2530-4381-AC56-FD5FF21D3AB5.jpeg
    322.1 KB · Views: 5
  • 8297000F-4D9E-4C07-BAA3-43F461DB6190.jpeg
    8297000F-4D9E-4C07-BAA3-43F461DB6190.jpeg
    322.7 KB · Views: 5
  • 89B6AEAA-F5D8-490F-BF41-0C382593CE46.jpeg
    89B6AEAA-F5D8-490F-BF41-0C382593CE46.jpeg
    282.5 KB · Views: 5
  • 2952522B-6FDE-4B36-929D-B83DDA6F9D56.jpeg
    2952522B-6FDE-4B36-929D-B83DDA6F9D56.jpeg
    310.8 KB · Views: 5
  • D8682C3D-957B-4358-A22E-3C81DC734431.jpeg
    D8682C3D-957B-4358-A22E-3C81DC734431.jpeg
    370.7 KB · Views: 6
  • E999357A-7082-47AC-BE3E-E06E83ECB58F.jpeg
    E999357A-7082-47AC-BE3E-E06E83ECB58F.jpeg
    379 KB · Views: 6

Bill

Well-Known Member
Staff member
Donator
Getting that old bracket off is a pain in the ass. It looks really good. My last one, I just used a cutting wheel and then tapped the edges up with a body hammer and painted it. That exhaust should clear without any problems now. At least you didn't have to deal with welded subframe connectors.
 
Top