The pipes look interesting. I hadn't considered building in a counter-resonance to defeat a specific drone frequency. I've used high-temp rubber tape to dampen drone harmonics, but with mixed results...I also dig the pool noodles.
-
Hello there guest and Welcome to Modular Fox Mustangs home of the 2V, 3V, 4V, Coyote Modular Mustang Conversion Information Website!
To gain full access you must Register. Registration is free and it takes only a few moments to complete.
Already a member? Login here then!
You are using an out of date browser. It may not display this or other websites correctly.
You should upgrade or use an alternative browser.
You should upgrade or use an alternative browser.
Teksid 2V Tech Article (Must Read)
- Thread starter ModFoxMustangs
- Start date
The pool noodles have saved a lot of bumps and bruises! I was skeptical before i built the quarter-wave pipes, but i'm a believer now. It's a nice surprise when something like that actually works. Another nice surprise is the sound of the exhaust with that particular frequency removed. It's not like those Judd V8s, but it doesn't sound like a big truck either. Another good thing is that there's no flow restriction, the only thing going into those pipes is sound. I wholeheartedly recommend them.
Anybody have any tuning experiences? After finding out what it costs for a custom dyno tune, i'm considering investing in Tuning software and trying it out. I put the car on the dyno this morning, and it's a mess. The fuel trims on my datalogs are showing the PCM pulling out fuel, but the AFR sensor at the dyno shop shows a very lean (15:1) condition at idle. Another thing, they welded in the bung for the wideband sensor aft of the driver side muffler... Almost everything i've read says the wideband sensor should be before the cats. More research is required, as always
...regards, kevin
Anybody have any tuning experiences? After finding out what it costs for a custom dyno tune, i'm considering investing in Tuning software and trying it out. I put the car on the dyno this morning, and it's a mess. The fuel trims on my datalogs are showing the PCM pulling out fuel, but the AFR sensor at the dyno shop shows a very lean (15:1) condition at idle. Another thing, they welded in the bung for the wideband sensor aft of the driver side muffler... Almost everything i've read says the wideband sensor should be before the cats. More research is required, as always

...regards, kevin
Everything I have ever read/been taught is to put the wideband sensor (for non-turbo engines) just after of the collector (manifold or header) so that it is at the first combined and stabilized flow point of the exhaust. I don't think it matters which side (see note below), but never heard of one being installed after the muffler. The surface area and flow characteristics of each exhaust component would impact the data. I bet your sensor manufacturer has specific guidelines. An AFR of 15:1 doesn't seem like all that far out from what I've seen in the past on newly assembled engines, but it would be nice to get it down a bit for steady state operations. Did you record a lambda reading? I'm still geeking out a bit over where they installed the sensor. I don't know what the reading should really look like that far back. Does your tuner have the ability to pull the PCM's O2 readings? Most PCMs convert them to generic OBD II. That might be an interesting data point comparison.
Note: I sat in on a conversation when I was a JBA dealer with engineers discussing the impact of total combined pipe length from the exhaust port to the stabilizing collector on the flow dynamics, expansion speed, and temperature variations. There are manufacturers that create a specific spot on the header collector to put a wideband bung.
Note: I sat in on a conversation when I was a JBA dealer with engineers discussing the impact of total combined pipe length from the exhaust port to the stabilizing collector on the flow dynamics, expansion speed, and temperature variations. There are manufacturers that create a specific spot on the header collector to put a wideband bung.
Very good points, Bill. I'm a bit surprised at the wideband bung location too. I have read that placing the sensor aft of the cat will cause a slight lean reading when in closed loop, because of the cat function, so i agree that 15:1 is probably close to stoich. In open loop, the cat doesn't do much to the exhaust, and the wideband will see a richer condition, which makes sense. The shop didn't use lambda as a reference (i only saw AFR), but maybe that's just an option on their dynojet software? After i straightened out the O2 wiring issue, my datalogs show both upstream O2 sensors cycling the short term fuel trim the way they should, and the long term fuel trims have gradually evened out at about -15% to -17%. Given that i have installed larger injectors, this makes sense. I see that FORScan allows me to datalog O2 sensor voltages (and lots of other stuff), so i'm going to give that a try.
I've spent a few hours reading up on ECU (in the case of a 2004 Mustang, it's EEC-V) tuning, and it's a real jungle. Ask 5 people what's absolutely correct and carved in stone, and you get 7 opinions...
I'm going to start with a wideband sensor and gauge with datalogging ability, and i'm going to mount the bung on a collector. This has now morphed from a car project into a science project Even my car buddies are starting to look uncomfortable.
...regards, kevin
ps. i was quoted $1200-1400 for a dyno tune. That's Canadian dollars, so probably about $150 US, but still...
I've spent a few hours reading up on ECU (in the case of a 2004 Mustang, it's EEC-V) tuning, and it's a real jungle. Ask 5 people what's absolutely correct and carved in stone, and you get 7 opinions...
I'm going to start with a wideband sensor and gauge with datalogging ability, and i'm going to mount the bung on a collector. This has now morphed from a car project into a science project
...regards, kevin
ps. i was quoted $1200-1400 for a dyno tune. That's Canadian dollars, so probably about $150 US, but still...
After driving with the new engine for 4 months, i've decided it's about the same, power-wise, as the old one. I had a dyno session last week where the main change we made was in the spark tables. I've entered the new injector (24lb, the old ones were 21lb) data, high and low slope, minimum pulse width and breakpoint and calibrated the MAF. With about 2600km on the new engine, and after 2 oil changes, i'm revving it to 5300 rpm and it sounds good and pulls strongly... and produces 254rwhp and 312rwtq. Honestly, i was hoping for a bit more HP. There is more tuning to be done, specifically on fuel. It's running a bit rich, according to my nose and the soot in the tailpipes. I'm going to pull the plugs tomorrow to verify. I've added an HPTuners MPVI2+ to my tools, which makes it relatively easy to adjust tables in the tune. I just have to figure out which tables! For example, by removing 2 degrees of timing from the mid-load 2400 to 4000rpm cells, i picked up almost 40rwtq. Every day i datalog and modify the tune, hopefully i'll get the numbers i'm looking for.
The engine is running strong, sounds great, and seems to be getting decent fuel economy. I'm running it up to 5300 rpm now, likely will go for redline in a week or so. I think there's more power in it, i just have to figure out to access it. I need to look at fuel settings. HPTuners MPVI2+ is a pretty simple interface, but figuring out what all the tables control is key. I need to find out how to use it properly. ...regards, kevin
The engine is running strong, sounds great, and seems to be getting decent fuel economy. I'm running it up to 5300 rpm now, likely will go for redline in a week or so. I think there's more power in it, i just have to figure out to access it. I need to look at fuel settings. HPTuners MPVI2+ is a pretty simple interface, but figuring out what all the tables control is key. I need to find out how to use it properly. ...regards, kevin
I've asked a professional tuner to give me a hand. The plugs, O2 sensors and wideband sensor are all black, and i'm having a hard time figuring out how to remove fuel without going too lean. He's ok with teaching me as we tune, which is my goal anyway. I hope to start next week... right after i seal up that #&*%! oil leak at the rear of the engine.
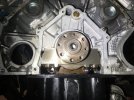
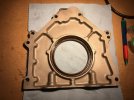
It appears the leak is between the block and the pan, and also between the rear main cover (which contains the rear main seal) and the block. I have to drop the front suspension to remove the oil pan. Then i can clean the mating surfaces between the block and the pan, install a new pan gasket with RTV on both sides, and use RTV on the rear main cover where it seals to the block. Interestingly, there was no evidence of RTV on any of those mating surfaces (the engine builder installed the rear main seal and the cover). The rear main seal itself looks good, but i have a new one to put in anyway. I'm going to be totally OCD meticulous about sealing the pan and rear main cover, it's a pain to get at, and i want this to be the last time i pull the exhaust/driveshaft/transmission/clutch/flywheel/suspension and lift the engine for clearance. No more oil drips on the garage floor!
...regards, kevin
Attachments
We all hate oil leaks. I have a diagram from one of the Ford 4.6 service manuals that tells where to put all the different little dabs of RTV. I tend to use to much, but as I said, we all hate oil leaks.
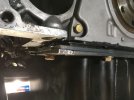
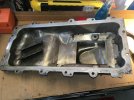
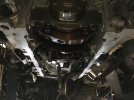
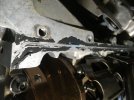
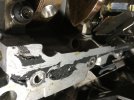
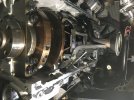
It's a bit of a pain to remove the oil pan. After i dropped the exhaust and driveshaft, and removed the transmission, bellhousing, clutch and flywheel, I unfastened the engine mounts and lifted the engine about 1-1/2", then dropped the k-member about the same amount to allow enough clearance for the oil pickup foot to clear the windage tray, and it came out easily. I found a couple spots where i didn't get a good seal when i tried to apply RTV without removing the pan completely. I think the worst leak was at the back of the engine. So, tomorrow i'll get very meticulous about sealing the new gasket against the pan and block, and sealing the rear cover against the block and the pan. I really don't want to pull all this apart again! Here are some photos of the block and the pan before and after cleaning. I used brake parts cleaner to wash the oil off the pan and block gasket areas, and scraped off the RTV that i tried to apply a couple weeks ago by lowering but without removing the pan. I'm really hoping i get a good seal by being meticulous (very) with the RTV, and this is the last of the oil leak!
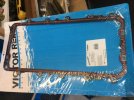
Here are some photos of the block and pan, before and after cleaning. You can see where the oil was finding it's way to the outside world. I upgraded to a "Victor Reintz" pan gasket from RockAuto. It seems a bit thicker than the original. Fingers crossed... I'll know tomorrow Did i mention that sometimes you learn things whether you want to or not?
...regards, kevin
Here are some photos of the block and pan, before and after cleaning. You can see where the oil was finding it's way to the outside world. I upgraded to a "Victor Reintz" pan gasket from RockAuto. It seems a bit thicker than the original. Fingers crossed... I'll know tomorrow
...regards, kevin
Attachments
-
 Pan gasket upgrade.JPG313.6 KB · Views: 8
 -
 Pan ready for RTV.JPG245.8 KB · Views: 8
 -
 Block ready for RTV.JPG252.6 KB · Views: 7
 -
 Block before cleaning5.JPG240.5 KB · Views: 7
 -
 Block before cleaning4.JPG224 KB · Views: 8
 -
 Block before cleaning3.JPG230.5 KB · Views: 9
 -
 Block before cleaning1.JPG274.2 KB · Views: 9
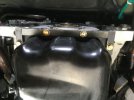
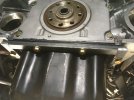
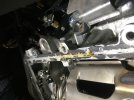
After installing the new pan gasket (with a continuous bead of RTV on both sides), i found that the RTV "oozed" out everywhere except at both rear corners. So i made up some braces from 1/8" steel plate and bolted them on. Very satisfying to see the RTV squeezing out where it didn't before. Either the pan is slightly bent, or just not strong enough between the mounting bolts to apply pressure evenly. Here's a couple photos of my "fix" (i hope).
...regards, kevin
...regards, kevin
Attachments
Time for a year-end summary on this Teksid two-valve project/obsession...
The new engine now has 4250.8 km/2656.75 miles on it. I've burned 538.2 litres (118 imperial gallons) of 91 octane fuel, so the average fuel consumption is 12.52 litres per 100 km, or 22.51 mpg (imperial). Almost all of the driving has been very focused on break-in and tuning, with no effort made to save fuel , so this is the worst fuel economy i expect to see (i sure hope so!). I've now done several WOT runs to 6,000+ rpm to log/adjust fuel and spark. The engine pulls strongly and sounds great. I'm going to book a "professional" (somebody who actually knows what he's doing
  ) dyno tuning session when the roads are fit to travel. I'm very pleased to report that the oil leak is gone after the new pan gasket, RTV application and home-made pan reinforcements... fingers crossed. I'm still hoping it will reach the magic 300rwhp number with a proper dyno tune, but even if it doesn't, i'm pretty pleased with it. I like the weight reduction on the front end, it "feels" different in a good way. I've let a couple Chevy people drive it, and they said "it doesn't feel like a Mustang", which is sort of a compliment, maybe?
I sure appreciate the input from you folks. Happy Hogmanay, i hope 2023 treats you well. ...regards, kevin
The new engine now has 4250.8 km/2656.75 miles on it. I've burned 538.2 litres (118 imperial gallons) of 91 octane fuel, so the average fuel consumption is 12.52 litres per 100 km, or 22.51 mpg (imperial). Almost all of the driving has been very focused on break-in and tuning, with no effort made to save fuel
I sure appreciate the input from you folks. Happy Hogmanay, i hope 2023 treats you well. ...regards, kevin
Attachments
Last edited:
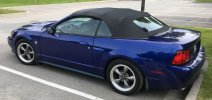
I hope you had a great holiday season. It is a beautiful car. I'm glad you are getting the bugs worked out. It seems there always are a few. We look forward to seeing how the tune works out. Every combination is a bit different on the dyno.
I was revisiting this post, as one of my current projects will require similar work. I really like the idea of a fabbed up reinforcement for the back of the oil pan. I've used hold-down tabs and various fender washers ground to an elongated shape, but didn't consider how easy it would be to use a nice bit of flat strap steel. This really is a great idea.After installing the new pan gasket (with a continuous bead of RTV on both sides), i found that the RTV "oozed" out everywhere except at both rear corners. So i made up some braces from 1/8" steel plate and bolted them on. Very satisfying to see the RTV squeezing out where it didn't before. Either the pan is slightly bent, or just not strong enough between the mounting bolts to apply pressure evenly. Here's a couple photos of my "fix" (i hope).
...regards, kevin
Thanks for the nod, Bill  . Sometimes the easy fix actually is the best. Sometimes. The block is still dry.
The ice and snow have gone, so i've put another few hundred kms on the new engine. I've been driving "more" conservatively, and got 28mpg on the last tank of 91 octane, so i'm sure it'll be over 30 on the highway.
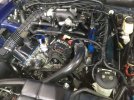
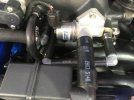
I decided to get rid of all the injector adapters, so i soldered the new connectors onto the factory wiring. While i was at it, i unwrapped the loom on both banks, and lifted the injector and COP cabling off the valve cover studs. Much cleaner. I also re-routed the PCV vacuum hoses to the back of the block, then across to the middle and forward, under the throttle body and into the IAC, intake pipe and plenum base. I used PVC landscape irrigation hose and elbows. No more tangle of hoses across the engine. No codes, no vacuum leaks. I'm watching closely to see what effect the engine compartment heat has on the hoses, so far so good. Here are a couple photos:
...regards, kevin
Attachments
Last edited:
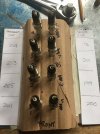
May 7, 2023 update... I decided to have a look at the plugs (i'm using NGK TR55GP) and do a compression test just to see what's going on inside the engine. With the 12cc dish pistons, .030" overbore and factory Romeo heads at about 42.5cc chamber volume, the static compression ratio is around 10.7 to 1. With the stage 1 cams, the dynamic compression ratio is closer to 10.3 to 1. The dry cylinder pressures are between 198psi and 214 psi. From what i've read, a variation of less than 10% is good. Interestingly, the right (passenger side) bank is consistently higher than the left bank. I was meticulous when i degreed the cams, and i'm confident they're as close as i could get them to the cam card specs, so i'm a bit surprised by the difference between the banks. I cranked the engine on each cylinder until the pressure peaked, between 15 and 30 compression cycles per cylinder, and checked each of them at least twice. The plugs look good, no deposits to speak of, light tan colour. Here's a photo of the plugs and the pressure numbers: ...regards, kevin
Attachments
Last edited:
The numbers on the cardboard don't really concern me and the plugs look pretty normal to me. When you think about the firing sequence (1-3-7-2-6-5-4-8) I'm wondering if you get an odd harmonic at certain speeds that is set up by the #3 and #4 cylinders. The 5% difference (7.5% in the 5-4-8 arch) really isn't much for a typical street duty engine. I'll have to give that some additional thought, as I'm not sure it would be strong enough to make a difference beyond a tiny wiggle on a dyno chart. What are your thoughts on what it feels like?
Thanks for the note, Bill. The engine feels like it's running smoothly at all RPMs, except at idle. There is a subtle cam lope at 750 RPM. I have noticed that the RPMs "hang" a bit when the car is moving above 5mph and i let off the throttle, like "cruise control". I've been tinkering with the idle RPM and idle dashpot settings to see if i can change this, and it's better, but now i occasionally get a P0300 code right after cold starts. You made a good point about the firing order, the 5-4-8 pulses might be a bit uneven, with the high cylinder pressure in 4 accelerating the crank a bit more than the pulses before and after at idle RPM? I didn't get the P0300 codes when the idle was higher (900rpm), so i'm going to gradually raise the idle to see if it gets rid of them.
Anybody know of a set of Trick Flow 185 heads gathering dust and taking up space in the shop? ...regards, kevin
Anybody know of a set of Trick Flow 185 heads gathering dust and taking up space in the shop? ...regards, kevin
June 19, 2023 update... Raising the idle to 800rpm eliminated the P0300 codes.
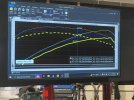
I finally had the new engine tuned on the dynocom dyno at Classified Motorsports (Kyle) today. The baseline run showed 299hp/312tq, which i was very pleased with after all my tune-hacking in the past few months. Kyle the tunemeister proceeded to tweak the spark and fuel tables and popped the numbers up substantially. The highest he was willing to go was 338hp/345tq, and he dialed it back to run safely at 330hp/340tq on our local 94 octane (which he calls garbage gas... don't get him going on the fuel quality here). I'm absolutely amazed! The engine runs smoothly and sounds fabulous. The whoop it delivers between 4500 and 5500 is visceral when you're standing right beside the car in the shop. Here's a photo of the 3 runs prior to the final tune. ...regards, kevin
ps... the oil pan is still dry
I finally had the new engine tuned on the dynocom dyno at Classified Motorsports (Kyle) today. The baseline run showed 299hp/312tq, which i was very pleased with after all my tune-hacking in the past few months. Kyle the tunemeister proceeded to tweak the spark and fuel tables and popped the numbers up substantially. The highest he was willing to go was 338hp/345tq, and he dialed it back to run safely at 330hp/340tq on our local 94 octane (which he calls garbage gas... don't get him going on the fuel quality here). I'm absolutely amazed! The engine runs smoothly and sounds fabulous. The whoop it delivers between 4500 and 5500 is visceral when you're standing right beside the car in the shop.
ps... the oil pan is still dry
Attachments
Last edited:

